Child's Play
Damian and Linda's Photography
Film Photography
Which is better, film or digital?
Why do I like Fuji Velvia 100F?
- The right film gives very similar results to digital
- Fuji Velvia 100F has the lowest noise, better than a Nikon digital SLR
- It has similar exposure characteristics to a Nikon digital SLR
- It has similar white balance characteristics to a Nikon digital SLR set on "direct sunlight" white balance
- Other films are available!
Of course, bearing in mind which technology came first, it's fair to say that the most likely explanation is that the performance of professional slide film was the target for Nikon's digital imaging equipment, at least in the early days.
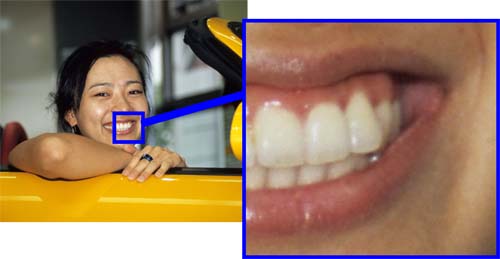
When I photographed Kumi in Tokyo I used Fuji Velvia 100 - she has a great smile and the film noise is very low when you look closely at the picture (above).
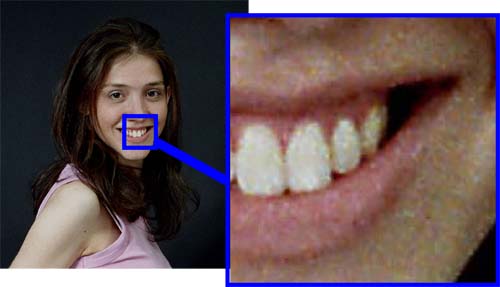
In fact the pictures were so good they made me go back and look at some of my earlier results. Annelie (above) also has a great smile but when you inspect the image it is clear that the film itself has a high level of noise (left). By "noise" we mean essentially random variations from the "real" value for the colours of each small picture element ("pixel").
I was astonished at the difference in image quality between Fuji Velvia, the recognised benchmark in film quality at the time of writing (2004), and the Jessops 200 ASA print film that I had previously regarded as "adequate".
This prompted some curiosity in me and so naturally I set about finding out whether it was a systematic difference and whether I could quantify it.
A little bit of research on the world-wide-web quickly turned up an article in Popular Photography[1] where 83 different films were compared one to another, but this had terms like "high" and "very high" and "extremely high".
Thus was born an exercise in which I selected 13 films on the basis of that article, and took a number of test photographs on them. A Nikon D70 was used a digital comparison. It wasn't my D70, as I didn't have a digital camera at the time.
Method
The films were all ordered from the same supplier (MX2 in the UK) so that they were of "comparable" history, and stored in the fridge once they arrived. The only exceptions to this were the two Jessops films, which were fresh examples from the Solihull store (although it's difficult to know how long they have been in-store).
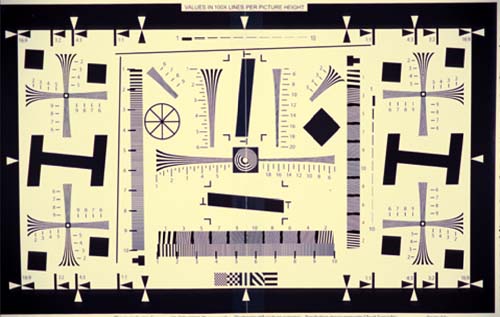
Some reference images were researched and printed on the Canon S900 I used for proof prints. It has good resolution (although the ISO12233 test chart clearly got the better of it) and prints good dense images on Jessops photographic paper.
The images were attached to a convenient piece of board and then photographed using a "copy" light setup with two lighting units at 45° either side. A flash meter was used and the camera setup to run at f4, 1/250th of a second. This was the fastest flash synchronisation speed on my Nikon F801 and gave maximum robustness against shaky hands.
Having taken lots of rather strange photographs, all the print films were taken to Jessops in Solihull and the slide films were taken to Colab in Coventry. The sole exception was Kodachrome 64, which was sent in the envelope provided to Switzerland for processing and arrived back six days later.
Once the films were back, they were scanned using my Nikon LS-V scanner and saved variously as 8- or 16-bit TIF files, compressed with the non-lossy LZW algorithm. The resulting files were read into Matlab (a maths program, a bit like Excel but with real teeth) and processed using a small command file written expressly for the purpose.
Results
A photographic "18% Grey" card was used to assess the colour balance of the process as a whole and the ISO12233 card was used to assess resolution. The Matlab routine calculated the colour balance of an area of the grey card and also the exposure level achieved by my manual setup of the lights. Most of the films were 100 ASA and since the light setup was consistent for the 100 ASA films, the exposure level gives a feel for the accuracy of the film speed.

"18% Grey" is "50%" in RGB terms - i.e. 127 127 127 or 7F7F7F. The right half is 12% - see later in the text for the importance of 12%.
The fact that an 18% grey card actually represents a "middle grey" colour is not particularly intuitive to me. A little research reveals that there are "scientific" and "observed" measures for light[2], in much the same way as there are for sounds and vibration. The scientific measure is "luminance" and the observed measure is "lightness". The observed measure is predicated on a so-called "standard observer" and, as with all these things, individual sensitivities vary but the figures are useful for the population as a whole. Luminance (Y) and lightness (L*) are related thus:
Yn is the luminance of something "truly white". Unfortunately such a thing doesn't really exist; from our perspective it's something so light that were it made lighter, we wouldn't notice it.
The use of the fraction to a "reference white" is very helpful since it removes the need for actually knowing anything about luminance and also means that we can fairly instinctively translate the concept to reflected light (strictly speaking, the definition of lightness applies only to objects actually giving off light).
It can be seen that if the luminance of our subject is equal to the reference brightness, then we perceive it as "fully white" - note that our definition of Yn was such that we couldn't perceive anything brighter; if that's not the case then we chose the wrong Yn.
So, back to our question about what seems "half as bright as white", which we might call "middle" or "mid" grey since it's half way to black. Well, using the algebra to plot the curve in the figure it's very clear that if the light level falls by 82% (to 18% of the original) then we "think" it's halfway to black (below) hence an 18% grey card is also 50% grey.
It's a common myth that camera exposure meters are based on 18% (I thought so too until I was researching this) but in fact the ANSI standard to which they adhere is more like 12%. However, the fact remains that if you're using a grey card to expose something obviously too dark or obviously too light then you'll get better results with one than without.
Below are the visual results from the grey card test - note the juxtaposition in the bottom left hand corner of the two films that kicked all this off - under extreme magnification from a 4000 dpi scan. However presenting this information, itself in a compressed JPEG file, across the internet and onto uncalibrated monitors and printers is not really satisfactory.
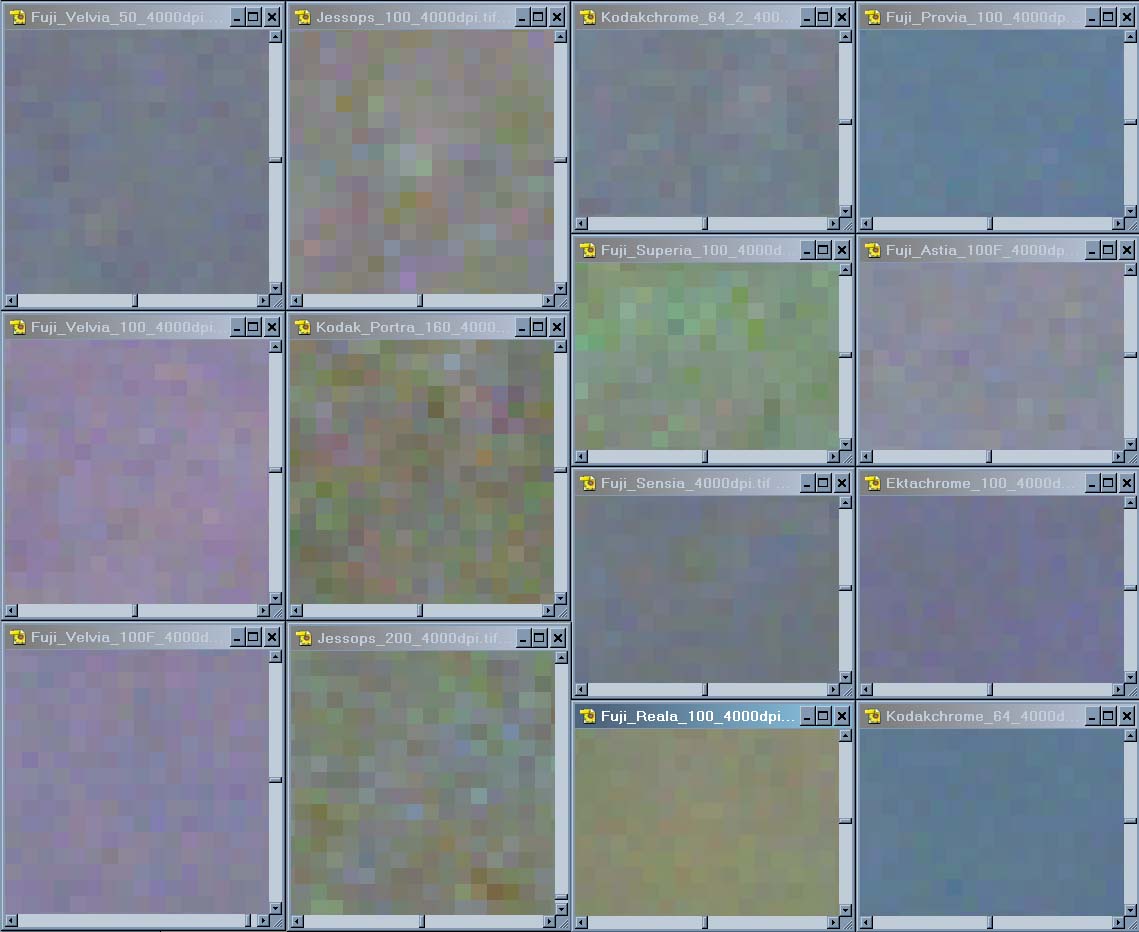
While it is clear that Kodak Portra (second from left, second from bottom) fares very badly here, it is also clear that many of the films appear "usefully better" than the reference Jessops 200 ASA (second from left, bottom) - but it isn't really clear which of them is "the best".
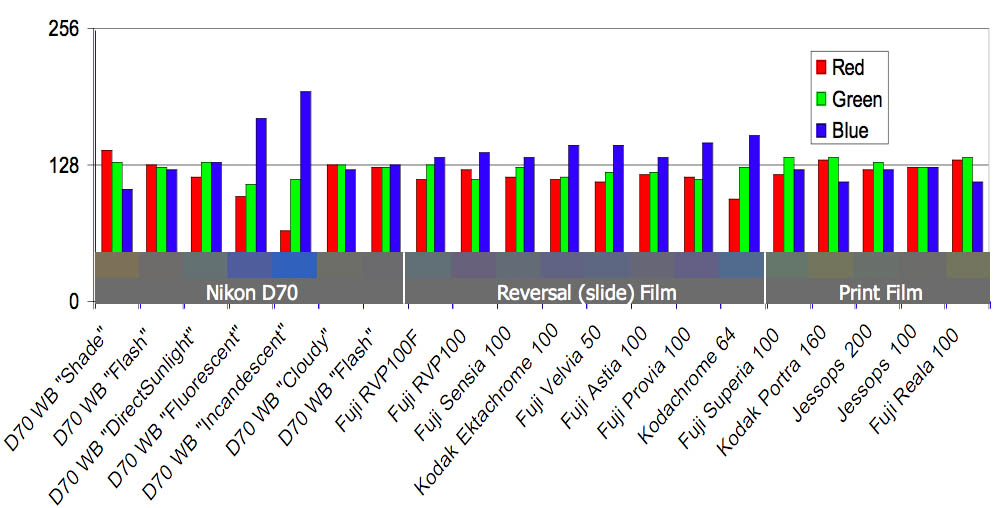
The colour balance results achieved under flash illumination including D70 White Balance settings are shown above. The lower (label) bar is mid-grey to allow comparison on uncalibrated printers and monitors. All the colours have been compensated for under- or over exposure.
The graph shows colour balance results as received by the scanner. It is product of the original film colour balance, the lighting balance (master and slave Portaflash units) the processing chemistry and the scanner calibration. Individual variations cannot be ascribed within those four categories although it seems reasonable to presume that the lights and film scanner are consistent for all images and are thus not the source of variation. Similarly, the processing of all the print film at the same laboratory should minimise differences within that group and the same for all the reversal (slide) film. The only outlier is the Kodachrome, sent to a different laboratory.
A striking observation for me is that Jessops 100 ASA film processed at Jessops gave "perfect" colour balance results on the film scanner - and why wouldn't Jessops optimise their chemistry for flash photography on their own film? Needless to say the accompanying print was pretty awful when compared to the actual grey card, being a grisly yellowish grey like a smoker's fingernails, but at least the information is correct on the negative. Faintly bizarre was that the scanner preview software was clearly mystified by all these pictures, giving randomly weird blue, yellow and even white images in the preview pane although faithfully scanning the images when the proper big boy scanner software took over.
Also of interest is the consistent bias away from red and towards blue of the various slide films, which is not at all apparent in the print films, under flash illumination. As mentioned this could be a property of the processing lab and not necessarily a property of the films themselves. The D70 balance on "Direct Sunlight" most closely resembles that balance except for some truncation of the blue, presumably for aesthetic reasons of warmth. Whereas I always thought that flash and daylight were broadly equivalent, I learned in this exercise that's not the case. Further, there are significant variations in films nominally declared as "daylight". Thus it's eminently plausible that a "popular" film like Jessops 100 ASA would be matched to flash illumination even though it's declared as a "daylight" film just like all the others. Both Fuji Reala and Kodak Portra look to have a balance biased towards warmth and most closely resembling the D70 "shade" balance.
Noise was evaluated by calculating the standard deviation of the pixel values of each colour channel separately, and also together. Standard deviation is a property of any distributed set of numbers and is calculated thus:
It is the "average deviation from the mean". Standard deviation is a better measure of noise than simply looking at maximum and minimum, which might just be a single rogue point rather than a systematic noise level in the film.
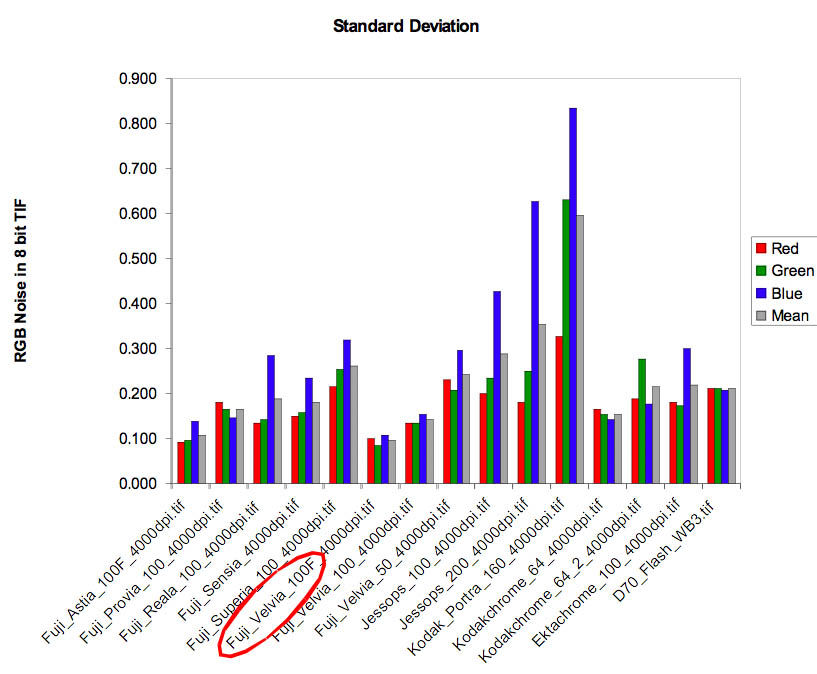
It is immediately apparent that the two reversal films branded "100F" have the lowest noise levels and with Velvia showing the edge in the blue channel noise. As seen on the visual results, Kodak Portra has an astonishing level of noise, particularly in the blue channel - over 8 times as much as the best film.

The D70 shows very creditably here, with noise levels "among the leaders". It is interesting to note that the character the D70 noise is significantly different, best being described as "lightness noise" rather than noise on individual colour channels and thus visually it appears as good as the Velvia film despite numerically being higher; note the per-channel values for the D70 are more or less identical to each other unlike all of the films which use a separate chemical layer for different chromatic responses. The other large difference with film noise is that it clusters around the "grain boundaries" of the film and thus gives a readily observable texture even though the statistical noise level is low.
Also reviewed, although not for every film, was exposure latitude. This was evaluated by generating a gradient in Photoshop and printing it, then photographing it. Although the Photoshop gradient is well defined mathematically, the printing process for the target is not. Thus the test is only really a comparison and not any sort of absolute test. The most dense black on the printout and the brightest white are not known. In order to evaluate exposure latitude a series of exposures were made from 3 stops under nominal to 3 stops over. The original target itself was also included in the analysis. The images were again read into Matlab and the grey values from multiple rows (typically around 160) and processed to identify the edges of the greyscale image, then the individual rows averaged to give data for the image as a whole.
The first film analysed in this way was Fuji Reala and the results are shown in figure 9. It can be seen that the image of the target is some way short of the actual target, particularly in terms of the most dense blacks and brightest whites. It could be that some of this is induced by software processing that takes place in the scanner but this was impossible to ascertain at the time.
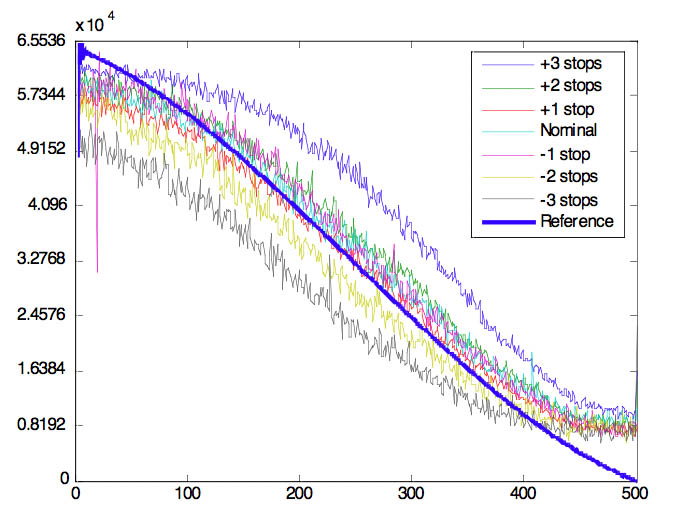
The Fuji Reala 100 exposure latitude test is shown above.
The ability of the film to shrug off a 1 stop error is clear since the lines for the images lay more or less over the top of the nominal image. Even +2 stops the image is quite complete but the range at the white end of the image is clearly falling away at -2 stops while the black end of the image is starting to be crushed. The inability of the film to capture the full range is very clear. At 3 stops away from the nominal exposure about a fifth of one end or other of the image is simply crushed flat, but all in all a usable image could probably still be rescued from even a 3 stop exposure error.
The results for Velvia 100F are immediately different and are shown below. The nominal exposure clearly lacks range in comparison to the print film, particularly at the light end (high numbers on the vertical axis). There are clear and wide differences between exposure levels either side of nominal, and the limited range of the film quickly becomes apparent with "black" being crushed up to almost mid-grey at 3 stops over-exposed and two thirds of the image being crushed up to white, with only the lowest third of the greyscale image actually being captured. A similar story is told in the under-exposure region, with whites being rendered as little better than mid-greys and the lower third of the range being rendered as a fairly uniform black.
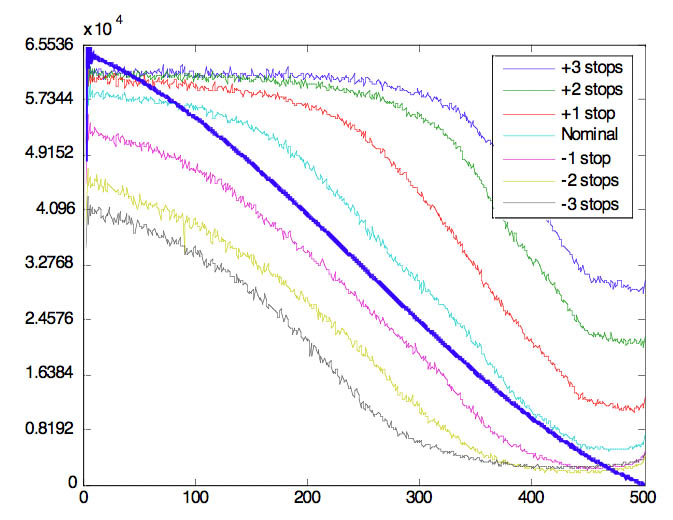
The Fuji Velvia 100F exposure latitude test is shown above.
The results for the D70 are different in character again and are shown below. Particularly clear is a hard clip to white with over exposure and a dramatic reduction in range in response to exposure errors. It would seem again that a slight underexposure is favourable in order not to clip the light end of the picture, and that there is more room under the bottom of the exposure to recover from underexposure than at the top. However, I see no reason to believe that more exposure accuracy is required with the D70 compared to Velvia.

D70 exposure latitude test is shown above.
Finally, a resolution test was performed using a Nikkor 28-105 mm lens and the Velvia results compared with the D70. The difference between the 6.1 Megapixel D70 and 21 Megapixel LS-V scan of the Velvia 100F is not as great as might intuitively be expected. The D70 image has been sharpened by the camera using the default settings and the Velvia image has been gently sharpened using the Nikon scanner software. Although the D70 image seems a little oversharpened, as evidenced by the white halo around each entity, it seems clear for any sensible magnification there is little to choose between them. The difference in colour of the two images is accounted for by a) poor use of a preset white balance on the D70 and b) incomplete calibration of the scanner for the Velvia film. Getting the white balance right on digital SLRs is one of the biggest challenges I have found and is the primary reason I shoot in RAW format, to allow me to pick the colour balance later as I do with scanned film.
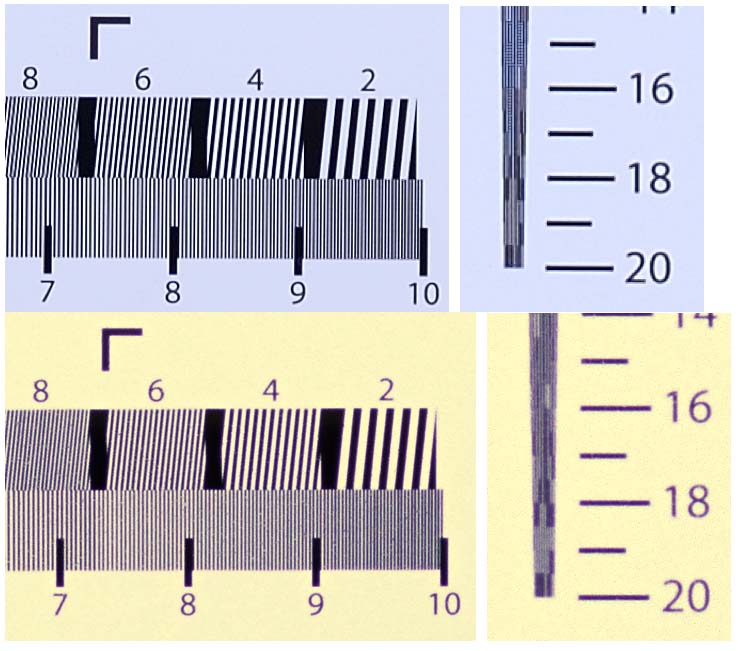
A Resolution comparison between Fuji Velvia scanned with Nikon LS-V (21 megapixel) and Nikon D70 (6.1 Megapixel) is shown above.
The D70 used in this test ultimately didn't convince me to switch to digital, although its use at a wedding in 2004 alongside my film body did make me feel that acceptable digital quality was very close indeed. As I considered a D2X, rumours of the D200 giving 80% of the performance for half the price were heard and so I held back until the exellent D200 was launched in early 2006. It served me well as my primary camera until my photographic business did well enough to buy me a D3 with a 24-70 lens, which is still my primary camera now. The D200 served as a backup and macro camera when I was doing it for a living, and is now in honorable retirement after nearly 100,000 exposures. The rubber grips are a little dislodged but still works just fine at the time of writing.
Digital equipment definitely saves time and is excellent for a studio workflow, but it doesn't give a step change in quality compared to good film in a good film SLR or medium format camera.
Because digital is no worse than film, in the end the inconvenience of film has all but driven me away from it for photography in highly lit environments. I have one last roll of Fuki Velvia, but it's horribly out of date and largely symbolic now. I still like the F801, though and I expect I will keep it for the same reasons I keep my father's 1936 Kodak 620.
Where digital has really won out for me is the low light performance, which has become bewilderingly brilliant. It's now perfectly possible (and has been since at least 2008) to take pictures in light when it is more or less impossible for you to see with the naked eye what it is you are actually photographing.
Click here to see the accompanying article on digital resolution and image storage.
Conclusions
- Fuji Velvia 100F is the lowest noise film in this test by the measures used.
- Fuji Reala is the lowest noise print film in this test by the measures used.
- Jessops 100 ASA has the most faithful colour reproduction under flash in this test.
- Kodak Portra NC displays a simply amazing amount of noise in this test, around six times the level of the best film.
- Systematic slight underexposure may be helpful (1/3 to 1/2 stop) to get the best range out of Fuji Velvia 100F, particularly retaining detail in highlights.
- D70 would seem to reward similar slight systematic underexposure
- Fuji Velvia 100F is the film for me!
Damian Harty
Damian is a trained engineer with Bachelor and Master's degrees and a Fellow of the Institution of Mechanical Engineers. This goes some way to explain his inability to simply use technology but his preference rather to deconstruct it and write down what he finds. And then use it.
[1] http://www.popphoto.com/assets/download/7222003125937.pdf
[2] http://www.poynton.com/notes/colour_and_gamma/ColorFAQ.html
© 2006-2016 Damian Harty. Design by Andreas Viklund.